

Sunday, November 11, 2012

Sunday, May 20, 2012
Well, after all this time I finally had a weekend to work on my Jeep and get the Rock Krawler HD Deep Sump Transmission Oil pan installed. I also hooked up the B&M auxiliary cooler as planned after draining the entire 8.8 quarts of old fluid using a fill & flush process that gets the old fluid out of the torque converter and other nefarious places. As noted, just dropping the old pan only gets about 4 quarts of old oil. This may be alright if you change tranny fluid frequently, but since my fluid was slightly burnt from being over-heated, I wanted to get all of it out.
 You can really see the size difference of the Rock Krawler pan on the right versus the OEM pan on the left.
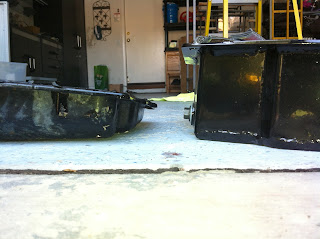 The deep sump pan combined with B&M auxiliary cooler added an additional 2.2 quarts to the system. Total capacity is now a whopping 11 quarts of tranny fluid. This extra capacity will greatly aid in the overall cooling efficiency of the transmission and, by the design, will help avoid any fluid starvation in the event of an extreme off-road angle one can find oneself in from time to time.


The swap-out, fluid flush and re-fill, which includes a new oil filter with extension tube to reach the bottom of the deeper pan, took about three hours - mainly because of the time to pull and prep the exhaust cross-over pipe.
 You can really see the size difference of the Rock Krawler pan on the right versus the OEM pan on the left.
 The deep sump pan combined with B&M auxiliary cooler added an additional 2.2 quarts to the system. Total capacity is now a whopping 11 quarts of tranny fluid. This extra capacity will greatly aid in the overall cooling efficiency of the transmission and, by the design, will help avoid any fluid starvation in the event of an extreme off-road angle one can find oneself in from time to time.
The new pan fits just behind the exhaust cross-over pipe and I had to remove it to lift the pan in place. The pipe is so close and gets so hot that I decided to wrap it with heat-reduction cloth and then sealed it with High-Temp Silicone paint. I also added heat-reflecting tape to the front and sides of the oil pan.


The swap-out, fluid flush and re-fill, which includes a new oil filter with extension tube to reach the bottom of the deeper pan, took about three hours - mainly because of the time to pull and prep the exhaust cross-over pipe.
Thursday, September 8, 2011
Well, here it is already September, where did the Summer go? I have not been able to get either my Rock Krawler deep sump tranny pan, or tranny cooler installed yet. I did make an attempt at the tranny cooler but was sidetracked when I punctured a hole in the Air Conditioning condenser that sits in front of the radiator.
I did get the Gen2 kit from RIPPMODS installed and the jeep is running better than ever.


I did get the Gen2 kit from RIPPMODS installed and the jeep is running better than ever.
I am also in the middle of my AEV premium 3.5 inch lift install. I have the front suspension completed (see pics below) and will be starting the rear suspension today.


Compare this view from the stock suspension of Jeep picture at top of this blog! Even though it is a 3.5 inch frame lift, the body is lifted by as much as 6 inches.
Monday, June 20, 2011
JK Automatic Transmission Overheat Problem
Well, as you owners of JKs may well know, the 42RLE auto-tranny has some overheat issues. I decided to track the oil temp using two Glow-Shift transmission oil senders and gauges. I installed one on each oil cooler line as close to the tranny as possible. I took a test run up Highway 79 to Palomar Mountain Road out of Pala (I-15).


The outside ambient air temp was a cool 63 degrees outside.

By the time I reached the Hw79/Palomar Mt. Rd (S. Grade Rd.) split, my tranny was a whopping 288 degrees! This picture of my gauges is proof positive...the one on the left (blue) is on the transmissions oil "in" line (post-stock cooler) and is reading 252 degrees; the one on the right (red) is on the tranny oil "out" line (pre-cooler), which is reading nearly 290 degrees...ouch!
Even though that's not burning the oil, so to speak, it is seriously shortening the oil-life down to about 15k miles from what should be 100,000 miles.
This issue has been posted on JeepForum.com and JK-Forum.com and the reasons for this are many, not the least of which is a poor design from the factory as to where the stock-transmission cooler is mounted inside the housing of the engine radiator.
I suspect that I have also compounded the problem with the Warn PowerPlant Winch sitting so high in front of the JK grill.
However, I have a solution to the problem which will be a two-pronged approach. I plan to do what most of you all do, and install an auxiliary transmission cooler in line with the stock cooler, but, as a secondary solution, I am swapping out the stock transmission oil pan and replacing it with the Rock Krawler Deep Sump oil-pan. The larger oil-pan will add about two-full quarts of oil  capacity, aiding in cooling and all but eliminating oil pump starvation when inclined on those level 10 off-road hills and rocks! Here are some photos of the B&M Transmission cooler and Rock Krawler oil pan I will be installing...

 capacity, aiding in cooling and all but eliminating oil pump starvation when inclined on those level 10 off-road hills and rocks! Here are some photos of the B&M Transmission cooler and Rock Krawler oil pan I will be installing...
Here are the web-site links for the items I will be installing in the near future:
Rock Krawler Heavy Duty Deep Sump Tranny Pan:
http://www.rockkrawler.com/?r_intro=1
Note: The Tranny-Pan doubles as a skid-plate, eliminating the need for the stock skid plate which I will have to remove anyway as recommended by AEV when I install the 3.5 inch Premium Lift Kit.
http://www.rockkrawler.com/?r_intro=1
Note: The Tranny-Pan doubles as a skid-plate, eliminating the need for the stock skid plate which I will have to remove anyway as recommended by AEV when I install the 3.5 inch Premium Lift Kit.
P.S. I after the installations are complete, I will repeat my run up to Palomar Mt. and post my temp readings/results.
Friday, June 17, 2011
Ordered the Gen2 kit today
Spoke with Ross at RIPPMODS and ordered the Gen2 Upgrade kit. Should arrive in a week or so. I will be posting the mod here...stay tuned (no pun intended).
Thursday, June 16, 2011

My next major mod will be to (hopefully) install the GEN2 upgrade kit to my original (gen1) Supercharger. This will eliminate the methonol injection by using an intercooler and will also eliminate the "piggyback" black box magic that rides on top of the stock ECM program. The GEN2 uses a complete new re-programming of the ECM via the Diablo Predator programming tool. I'm hoping to make the change this summer along with some tranny cooling modifications which I will detail as well.

Monday, February 7, 2011
I'm really behind on my project updates. I had the Long-Tube Headers installed early this year, and have added a Body Armor Roof Rack and rear bumber with tire carrier. Need to add pics. I have also installed two transmission oil temp gauges, one from the hot (out) line and one from the cool (in) line. Need to get a set of benchmark readings. I have seen the hot temp as high as 285 (ouch!). I have already purchased a B&M Auxiliary Transmission Cooler and the Rock Krawler deep sump puncture proof transmission oil pan. Those both will be going on in the near future.
Wednesday, December 15, 2010
Upcoming Mods ---
- Possible GEN2 Upgrade to Super Charger from RIPPMODS
- AEV nth Degree 3.5 inch Premium Lift
- 35 inch tires (Goodyear Wrangler MT/R) and new wheels (AEV?)
- 5.13 Gears
- B&M Automatic Transmission Cooler w/Temp Gauge Kit
- AEM Oil Temp and Pressure Gauges
Recent Updates to my JK-Project


I thought it was time to update my blog. Since I last posted I have had to deal with my stock catalytic converters failing and plugging the exhaust system. Damm thing couldn't breath anymore. Well, since I needed new cats, I just decided to purchase the new Long Tube Headers w/after market cats exhaust kit from RIPPMODs to go along with my RIPP SC and my catback off-road peformance exhaust.
Man, this setup really breaths and sounds great now!
Thursday, July 30, 2009


Thursday, July 16, 2009
SDS Install is Nearly Complete
I have completed installing the Supercharger and it is working perfectly. The onl y component not yet installed is the Methanol / Water intercooler that is still back ordered. I have a few pictures of the final sequences.


 Battery relocated to where the air-box used to be.

 y component not yet installed is the Methanol / Water intercooler that is still back ordered. I have a few pictures of the final sequences.
Battery Box before cut-out of side facing the engine.

Looking down to reveal the cut-out. The cut-out mod of the battery box makes room for the Vortech V3 and High Flow Air filter.
 Battery relocated to where the air-box used to be.
New Granatelli MPG Zero resistance Spark Plug wires and NGK IX Iridium Plugs
Fuel line splice and tee for the added fueler rail


This is the new High-Flow Air Filter into the SDS
I'll have some final pictures and a wrap-up of how it "drives" in my next post.
Tuesday, July 14, 2009
SDS Install Final Stages
It has been a couple weeks since my last update, but I have not been idle when it comes to my JK project. My MBRP Performance Off-Road exhaust came in, so I decided to get that installed as part of the overall performance gain I expect to get from my SDS. The hardest part of removing the stock exhaust was trying to get the mounts out of the rubber retainers. After a lot of lubricant and some significant prying with my large flat-bladed screw drivers, I f inally managed to the get the stock system out. It is two pieces, a long connector pipe and the muffler. The muffler is the biggest reason for the swap, it hangs back there like a big garbage can, where any large rock will crush it, as noted in many Jeep forums.
The new exhaust comes in four pieces, a connector pipe, a performance muffler, an extension pipe (from the muffler), and a tail pipe (over axle). It all connects up to the same rubber retainers. The main difference is that the smaller muffler is mounted under the frame in line with the rest of the exhaust.


 inally managed to the get the stock system out. It is two pieces, a long connector pipe and the muffler. The muffler is the biggest reason for the swap, it hangs back there like a big garbage can, where any large rock will crush it, as noted in many Jeep forums.
 The new exhaust comes in four pieces, a connector pipe, a performance muffler, an extension pipe (from the muffler), and a tail pipe (over axle). It all connects up to the same rubber retainers. The main difference is that the smaller muffler is mounted under the frame in line with the rest of the exhaust.

One thing of note, MBRP highly recommends relocation of the EVAP canisterr due to the proximity of the new muffler (heat) to the unit. It is also a good idea to move it out of harms way as it is easy to catch on rocks and brush. I opted for the Die-Tech relocation kit that mounts over the rear axle (passenger side).

This provides added protection due to location and a steel plate that protects it from stray rocks and debris. The EVAP canister relocation provided plenty of room for the muffler underneath and still cleared the tail pipe over the axle (driver side).


Sunday, June 28, 2009
Battery Cables Extended (Lengthened)


Friday, June 26, 2009
Final phases of the prelims coming to a close...
The whole install should take about 6-8 hours, but I am a single vehicle family, and I want to minimize the impact (down time) as much as possible. So, I have already taken a few preliminary steps like mount the "black box", the map sensor, the AFR UEGO sensor, and the Boost pressure sensor.
I still have a few more prelims -
1) shorten the heater hose line by 3-inches - which means I have to drain about a gallon or so of engine coolant, 2) lengthen the battery cables to prepare for the relocation of the battery to where the OEM airbox currently resides, and 3) change the oil and filter (AMSOIL 0-20W full 100% Synthetic). I plan to get these steps done by this weekend, then the real fun begins!
Here is a brief outline of what has to happen to complete the entire SDS install:
I still have a few more prelims -
1) shorten the heater hose line by 3-inches - which means I have to drain about a gallon or so of engine coolant, 2) lengthen the battery cables to prepare for the relocation of the battery to where the OEM airbox currently resides, and 3) change the oil and filter (AMSOIL 0-20W full 100% Synthetic). I plan to get these steps done by this weekend, then the real fun begins!
Here is a brief outline of what has to happen to complete the entire SDS install:
- Remove the battery and set the EVAP valve out of the way
- Cut out the battery box to make room for the Vortech SDS
- Remove the Airbox and air intake
- Re-locate air sensor
- Re-locate EVAP value
- Change the spark plugs with the provided NGK Iridium IX (one step cooler)
- Make cuts to the airbox location to accomdate the new battery hold-down
- Remove OEM belt and water pump pulley ( will put pulley back on after SDS mounting bracket is installed).
- Attach SDS mount to front engine block
- Attach SDS to engine mount
- Attach all air intake tubes / filter
- Add new drive belt
- Connect all vacuum lines
- Splice in all "black" box wiring
- Make connections for the Meth Boost pump (lines, wires)
Wednesday, June 24, 2009
Wednesday Night at the Drag Races
Well, I had a little fun today, I took my stock Jeep out to the Wednesday night drags here at Infineon Raceway in Sonoma, CA. For $25 bucks you can race any street legal vehicle. They have brackets for High School kids, Sport Street (my class) for 4 and 6 cylinder engines, Street for the V8's and muscle cars, and, of course, the pro-comps, bikes and the like. I wanted to get a baseline for this Jeep of mine prior to beefing up the HP. So here's how it went down. My first trial run (first time ever), I ran 18.016 seconds with a top speed of 73.07 MPH. The air temp was 84 degrees and I was bucking a headwind. The second trial run was 17.906 and 73.78 MPH, the temp had dropped about 10 degrees to 74.
So now I had to set my dial-in ET. If you don't know about drag racing, your dial-in number is what you think your best ET will be. If you can hit you dial-in combined with a quick reaction time (launch) you can expect to be side-by-side at the finish even if the other guy is quicker, as long as you don't go faster than you dial-in you win if you hit the finish line first.
With the temperature continuing to fall, I went with what I thought would be a conservative 17.85 secs. What I found out is just how much effect air temperature has on an engine. By the time my first heat came, the air temp had fallen another 8 degrees, down to 66. Needless to say, I broke-out at 17.696 (74.53 MPH). To breakout means you ran faster than your dial-in and you lose, unless both cars breakout, then the one closest to his/her dial-in wins.
My first experience at drag racing was fun and I learned a few things to boot!
I now have my run slips for my scrap/log book and, along with some baseline dyno pulls, can really begin to concentrate on the SDS install:)
So now I had to set my dial-in ET. If you don't know about drag racing, your dial-in number is what you think your best ET will be. If you can hit you dial-in combined with a quick reaction time (launch) you can expect to be side-by-side at the finish even if the other guy is quicker, as long as you don't go faster than you dial-in you win if you hit the finish line first.
With the temperature continuing to fall, I went with what I thought would be a conservative 17.85 secs. What I found out is just how much effect air temperature has on an engine. By the time my first heat came, the air temp had fallen another 8 degrees, down to 66. Needless to say, I broke-out at 17.696 (74.53 MPH). To breakout means you ran faster than your dial-in and you lose, unless both cars breakout, then the one closest to his/her dial-in wins.
My first experience at drag racing was fun and I learned a few things to boot!
I now have my run slips for my scrap/log book and, along with some baseline dyno pulls, can really begin to concentrate on the SDS install:)
Monday, June 22, 2009
Gauges, A Must Have for a Supercharged Engine


Two gotta haves for running a SDS is a good Air/Fuel Ratio gauge to monitor if your running lean (bad for motor) or rich (bad for fuel mileage) and a manifold pressure (aka:Boost) gauge.
I picked up AEM digital gauges for both. The AEM Wideband UEGO AFR with the Bosch sensor (p/n 30-4100) and the -30-35 Boost (30-4406).
While installing the gauges, I added a DIY Green light indicator for when the Meth Boost / Intercooler Injection kicks in. The meth/water injector has a user selectable set of controls for setting the manifold pressure you want the injector to lick in. The indicator light will give me a positive confirmation that it is working at the specified control points.
I made the indicator from a simple 12v green light and a short piece of 5/16" rubber tubing. The wires for the light are spliced into the power feed line from the Injector controller to the Injector pump.
Sunday, June 21, 2009
Map Sensor (Blue) and Fuel Control Install
Well, I have managed to get the basic electronic components mounted under the dash board, and all the wires are connected (pre-wired) on this side. I have not tackled the splicing of the other ends into the ECU yet. That will come later, after I begin the main installation of the other major components, such as the battery re-location bracket, the SDS mount. the Vortech Supercharger, the fuel lines, all the vacuum lines, and the meth-boost injector. I'm still in the prelim side of things for now.
 I also managed to get all the vacuum lines labeled according to location and purpose. I adjusted the Blow Off Valve (BOV) to the recommended depth of three/four screw-threads showing above the lock bolt.
I need to find a good battery cable crimper that I can rent (they are just too expensive to buy for a one-time deal like this)!
Subscribe to:
Posts (Atom)